 | Acta Crystallographica Section E Acta Crystallographica Section E CRYSTALLOGRAPHIC COMMUNICATIONS |

 journal menu
![[Figure 2]](wm5041fig2mag.jpg)
|
|
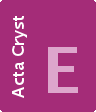
Figure 2
A packing view of (I) ![[link]](../../../../../../logos/arrows/e_arr.gif) , showing the slabs formed by neighbouring chains connected by C—H⋯O contacts (shown as dashed lines). , showing the slabs formed by neighbouring chains connected by C—H⋯O contacts (shown as dashed lines). |
![[Figure 2]](wm5041fig2.jpg)
| CRYSTALLOGRAPHIC COMMUNICATIONS |
ISSN: 2056-9890


